- Setting Your Baseline Step Count
- Flexibility Test - Sit and Reach
- Upper Body Strength Test - Push Ups
- Cardiovascular Fitness Test - Step Test
- Core Strength Test - Elbow Plank
- Balance Test - One Leg Stand
- Skate Lace Set Up
- Measuring Your Waist Circumference
- Measuring Your Hip Circumference
Setting Your Baseline Step Count
In preparation for your baseline assessment we ask that you wear your pedometer for 3 days and record your total step count for each of these days. Wear the pedometer at all times, not just when you leave the house. The only time that you should remove it is when you are sleeping or bathing. The best place for it to be worn is on the waist band of your pants or on a bra strap.

Flexibility Test - Sit and Reach
You will need:
- A Metric Measuring Tape
- Masking Tape
- A Pencil
- A Juice Box
- Tape the measuring tape to the floor measuring out 80 cm.
- Place the pencil perpendicular to the tape at the 40 cm mark.
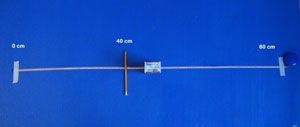
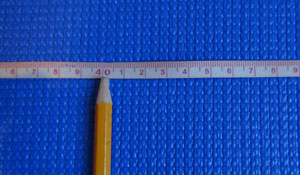
- Sit with your legs straight in front of you on either side of the tape and the bottom of your feet lined up with the pencil.
- Place the juice box on the tape at the start position at the 20 cm mark.
- Take a deep breath, exhale and reach forward pushing the juice box along the tape line with your finger tips as far as you can.
- Inhale and return to start position, without moving the juice box.
- Note where you pushed the juice box to on the measuring tape. If you pushed it past your feet your number will be 40 or greater. If you were not able to push it past your feet your number will be less than 40.
- Repeat the test 3 times and record the greatest distance that you reached.
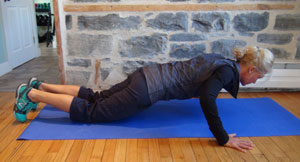
Upper Body Strength Test - Push Ups
You will need:
- Your Mat
- Lie face down on your yoga mat.
- Place your hands just outside of shoulder distance apart and lined up with your shoulders.
- Engage your core and tilt your pelvis to neutral.
- Exhale and push yourself up until your arms are straight but not hyper-extended.
- Hinge off your knees.
- Inhale and lower yourself down until you have a 90 degree angle at your elbows.
- Perform as many repetitions as you can.
- Record your max number performed.
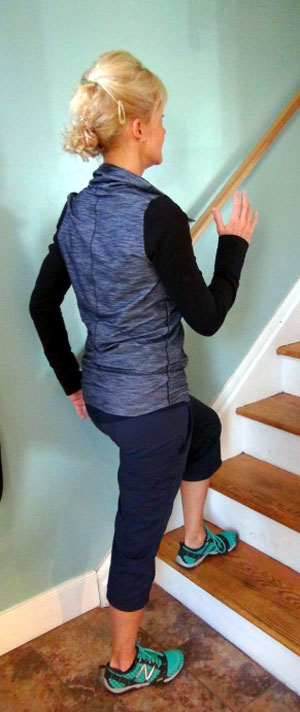
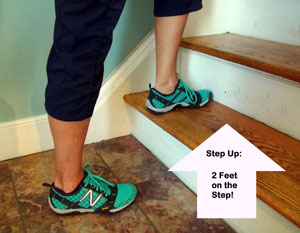
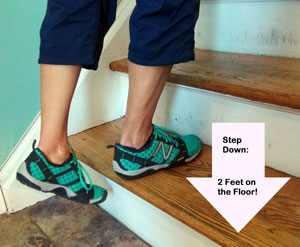
Cardiovascular Fitness Test - Step Test
You will need:
- A Stop Watch or Timer
- A Step (please use a standard height staircase step)
- Set the timer or stop watch for 1 minute.
- Start the timer or stop watch.
- Step up and down the step as fast as you can.
- Count how many times you can step up and down in one minute.
Important: Be sure to place your entire foot on the step when you step up!
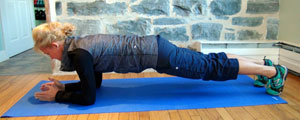
Core Strength Test - Elbow Plank
You will need:
- A Stop Watch or Timer
- Your Mat
- Start the stop watch or timer.
- Lie face down on your yoga mat.
- Place your hands underneath your shoulders,
- Engage your core and tilt your pelvis to neutral.
- Exhale and push yourself up onto your elbows hinging off your toes.
- Keep ‘as straight as a plank’ from top of your head to your toes.
- Hold this position for as long as you can with good technique and form.
- Stop the stop watch or timer once you break the position and record the time.
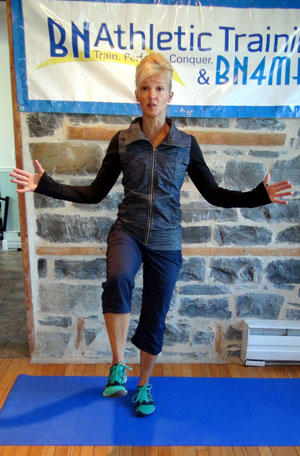
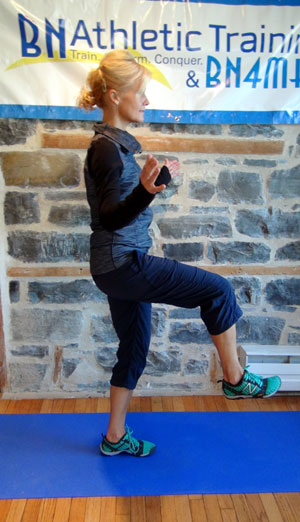
Balance Test - One Leg Stand
You will need:
- A Stop Watch or Timer
- Start the stop watch or timer.
- Stand on right leg with your weight evenly dispersed throughout your foot.
- Lift your left leg up in front of you with a 90 degree angle at your hip joint.
- Bend your right knee slightly, engage your core and hold your posture in neutral position.
- Focus on contracting your gluteal muscles to hold your hip centered.
- Be sure to keep your knees lined up with your hips.
- Hold this position for as long as you can with good technique and form.
- Stop the stop watch or timer once you break the position and record the time.
- Repeat on the other side.
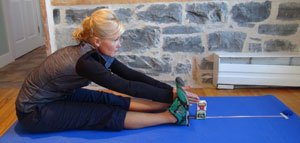
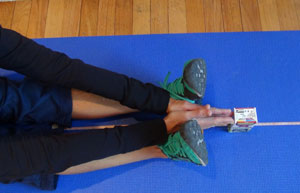
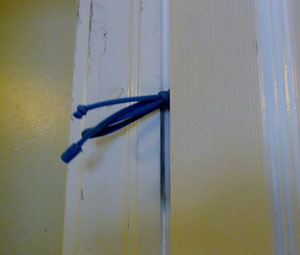
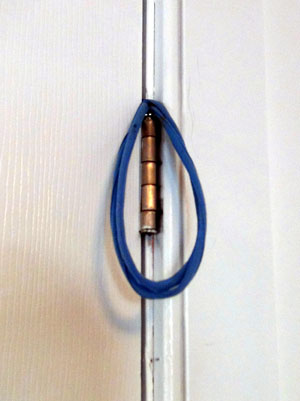
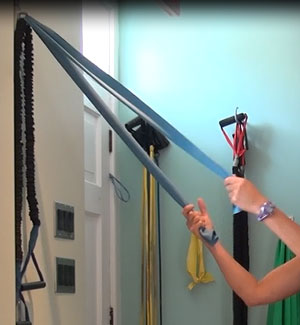
Skate Lace Set Up
You will need:
- Your Skate Lace
- Your Flat Exercise Band
- A door
For many of the exercises you will be asked to set up your skate lace and flat exercise band in a door. The following describes the proper set up.
- Tie you skate lace as shown in the picture below. Fold it twice and knot it twice.
- Open the door and place the tied skate lace through. The knot should be on the inside to anchor the lace and the double loop should be hanging on the outside.
- Close the door.
- Feed the flat exercise band through the double loop. Depending on the exercise you will either hold on to both ends of the band or tie one end of the band to the skate lace.

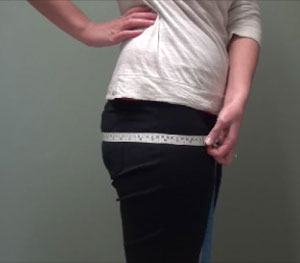
Measuring Your Waist Circumference
You will need:
- A Metric Measuring Tape
- Clear your abdominal area of any clothing, belts or accessories. Stand upright facing a mirror with your feet shoulder-width apart and your stomach relaxed. Wrap the measuring tape around your waist.
- Use the borders of your hands and index fingers – not your fingertips – to find the uppermost edge of your hipbones by pressing upwards and inwards along your hipbones. Many people mistake an easily felt part of the hipbone located toward the front of their body as the top of their hips. This part of the bone is in fact not the top of the hip bones, but by following this spot upward and back toward the sides of your body, you should be able to locate the true top of your hipbones.
- Using the mirror, align the bottom edge of the measuring tape with the top of the hipbones on both sides of your body. Once located, it may help to mark the top of your hipbones with a pen or felt-tip marker in order to aid you in correctly placing the tape.
- Make sure the tape is parallel to the floor and is not twisted.
- Relax and take two normal breaths. After the second breath out, tighten the tape around your waist. The tape should fit comfortably snug around the waist without depressing the skin.
Tip: Remember to keep your stomach relaxed at this point. - Still breathing normally, take the reading on the tape.
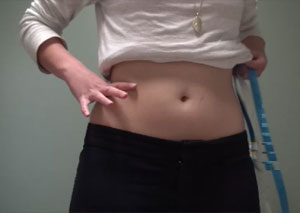

Further information from the Heart and Stroke Foundation and an instructional video may be found here.
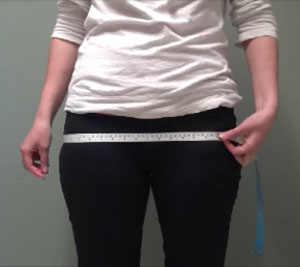
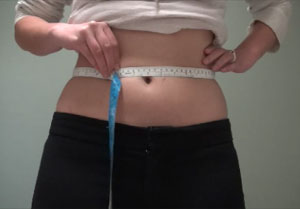
Measuring Your Hip Circumference
You will need:
- A Metric Measuring Tape
- Stand upright facing a mirror with your feet shoulder-width apart. Wrap the measuring tape around your hips.
- Locate the largest part of your hips. This is usually at about groin level at the widest part of your buttocks.
- Make sure the tape is parallel to the floor and is not twisted.
- The tape should fit comfortably snug around the hips without depressing the skin.
- Take the reading on the tape.